Welcome spring with a fun and easy craft! These butterfly pens make a sweet and simple garden-inspired gift perfect for teachers, parents, or friends. Bright, whimsical, and practical, they add a touch of springtime charm to any desk.

For Teacher Appreciation Week, for Mother’s Day, as a birthday party favor, or for any occasion, these butterfly pens are indeed a sweet spring garden gift!
How to Make Butterfly Pens– A Sweet Spring Garden Gift
No glue, no sewing, no lengthy prep, these butterfly pens are totally quick and so easy. And so beautiful.
And the really cool thing is that they’re easy enough that kids can get involved no problem. They can show their love and appreciation by helping to create these, while working their fine motor skills along the way.
With a little trip to the craft store, or visit to Amazon, you’ll have everything you need–and some pieces you may have under your roof already.
Another big win for these guys is that they make use of all that mixed-up, almost-on-the-outs PlayDoh that you’ve had sitting around.

Gather Your Supplies
Biggest tip? Spend the extra on good-quality butterflies. So worth it.
Here’s how to make these beautiful butterfly pens:
1. Make weights for your pails.
The pails are light. The pens are light. So if you don’t weigh them down somehow, they’ll tip over and just be a pain in the neck.
We just scraped together baseball-sized globs of old Play-Doh, rolled them into balls, and shoved them in the bottom of their silver pails.

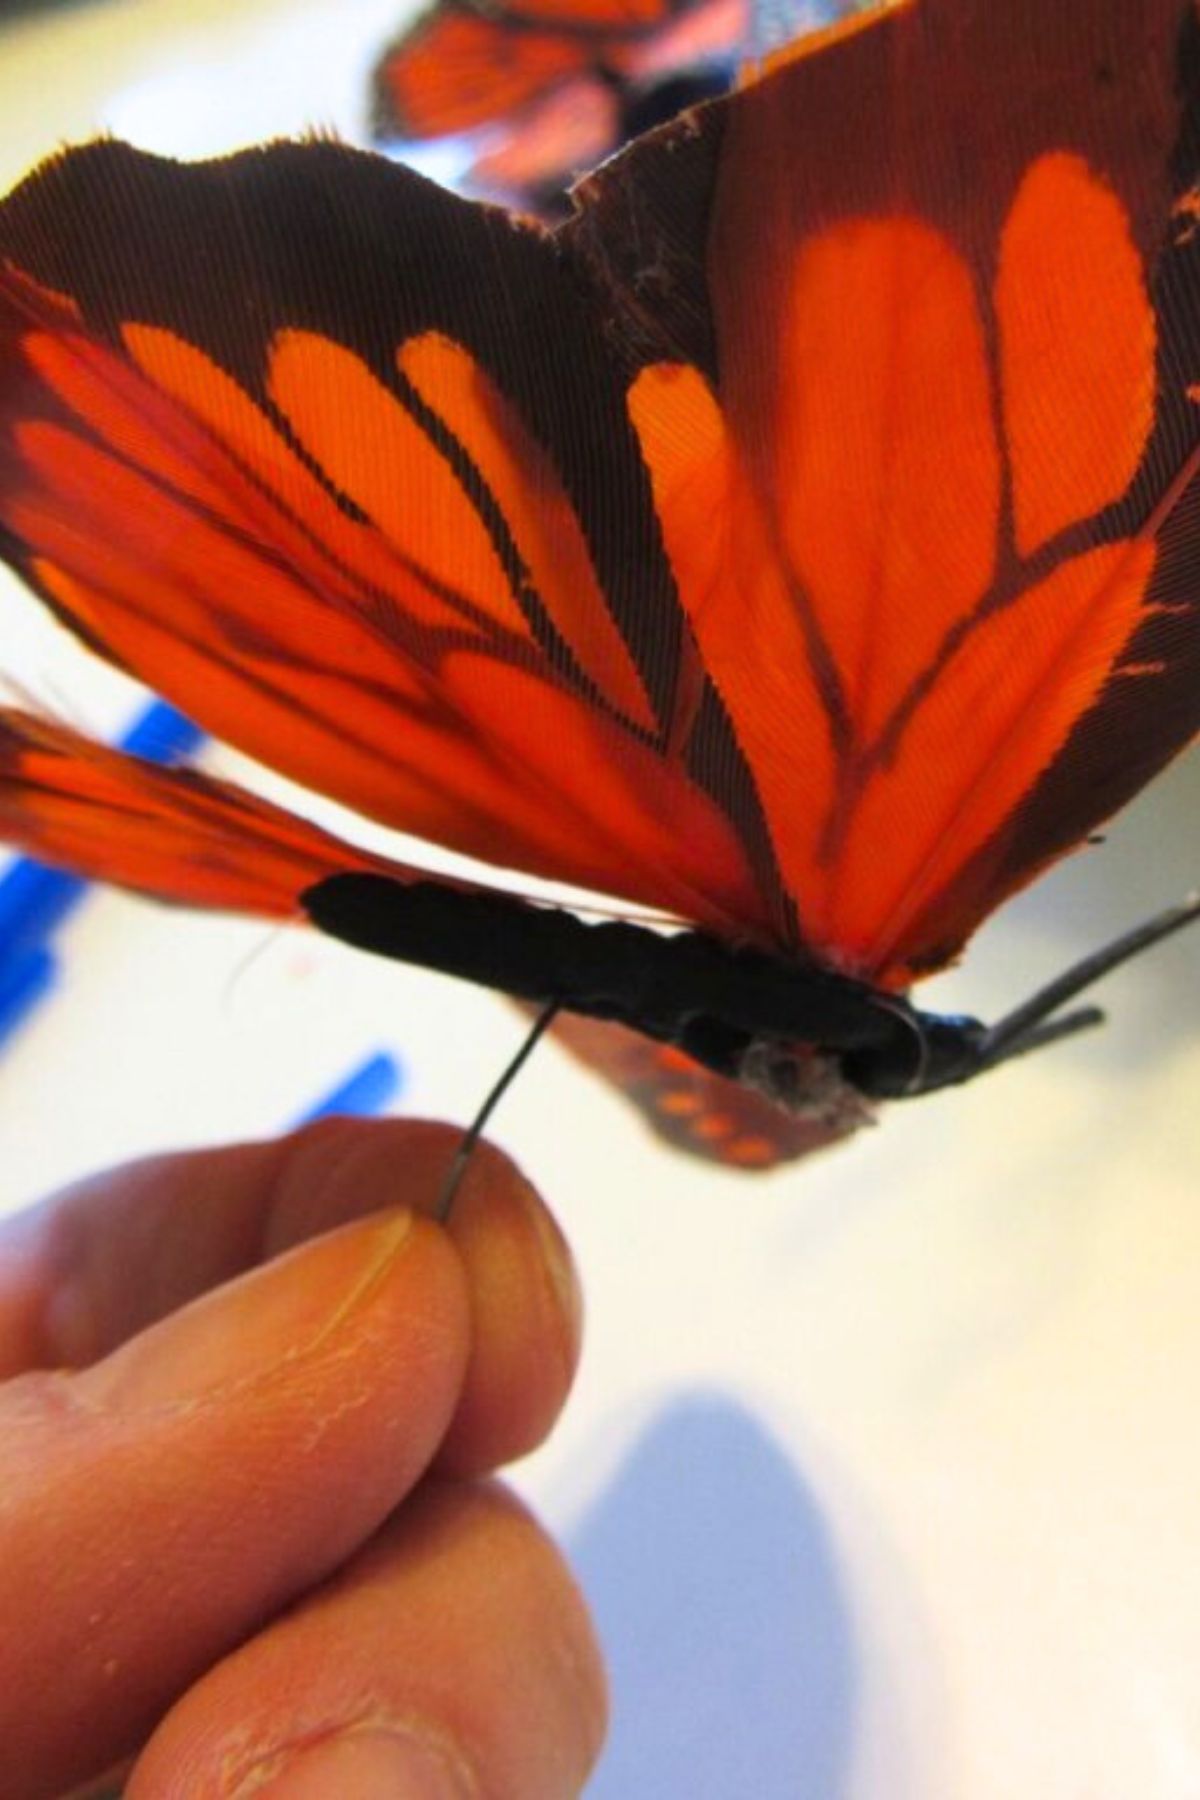
2. Wrap Butterflies around the pens.
The way these butterflies are made makes it really easy to wrap them onto the pens.
Take the caps off of the pens and start from the top, wrapping the butterfly wire around the pen.

3. Wrap the pen with Duct Tape.
This may be the most difficult part of the whole process, and it’s not even that difficult. Just tricky.
One thing to remember is that they do not need to be perfect. They can’t be perfect. And the more we remind ourselves of this, the more fun you’ll have doing it.
We cut the Duct Tape long enough to leave a teeny, tiny bit over the top and then we cut it short enough so that it ended before the curve of the pen tip.
Totally impossible to make these completely flat, so we went with the bumpy, wavy look
Tip: One thing we were careful to do was to flatten the very tip of the wire and then double-up on the tape.
Otherwise, if we didn’t, the pointy part of the wire would poke fingers as they used the pen. Ouch. Lucky it was an easy fix!

4. Fill the pail with grass.
So easy. Plop it in. Bam. Done.
Just don’t skimp on this because otherwise it’ll look strange. If you want to put a big bunch of glue on the Play-Doh to keep the grass in place, that works, but we found that we didn’t need to do that.

5. Add your butterflies and flowers to the little gardens. So fun.
The very first thing the kids did was pick the colors of their butterflies, so when it came time to add theirs to the garden tins, they knew exactly which three to grab.
No need for glue; the butterfly pens stick in pretty tightly among the crinkle-cut grass. Woot!
Add just a dab of glue to the flowers so that they don’t fall out.
We love them.
They couldn’t be more beautiful, and really, each one of the kids was so proud.
And so was I. Here’s to hoping that everyone who receives one loves her little butterfly garden!
And that’s it–just a little spring craft in the name of Teacher Appreciation and Mother’s Day. But really? It’s a super-cute something that could be used for any occasion!
We made one for each teacher, one for each grandmother, and one for great-grandmother. Shhhhh.
Though we made flower pens for our teachers and grandmothers and great-grandmother last year, the response was so great that we thought we’d do it again. New teachers meant it wasn’t a repeat gift for them, but I’m betting that the ‘mothers’ used their flower pens so frequently, it just might be time for replacements!
Happy butterfly-garden building!
Want a few more fun gifts to give for Mother’s Day or Teacher Appreciation Day?
PIN THIS FOR LATER